Keihin CVK40
The Care & Feeding Of Your Vulcan Carb
Originally posted by Redondo Ron on a now defunct AOL website in 1998. The pictures and text
are all his. Many thanks.
Part I - How It Works
THE BASICS - Mixing and Delivering
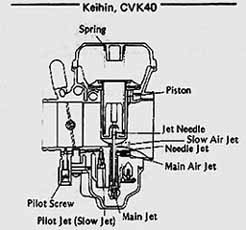
While most of the following information applies to all CV carbs, and to some extent all carb types, this article
is specific to the Keihin CVK40 found on many Kawasaki motorcycles (KLR's and Vulcans) along with some Harleys.
If you need replacement parts you'd be well advised to get them from your local Harley Davidson outlet. They will
be less expensive than ordering through your Kawasaki dealer and, in most cases they will be 'in stock'.
The CVK40 is technically a bleed type carb, with a variable venturi that's controlled by constant velocity (CV).
It's also known as Constant Depression or Constant Vacuum. The 40 in the name represents a 40 mm venturi exit diameter.
Wonder why 'K'awasaki added the K...?
BLEED TYPE CARBS - Let it Bleed
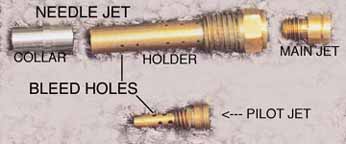 Most carbs have
a one piece needle jet. On the CVK40 it consists of a collar and what Kawasaki calls a holder.
Most 4-strokes have pin holes along the length of this brass jet. These pin holes allow air from the air jet to
premix with fuel from the fuel jet to start the mixture emulsification process before it enters the venturi. Primary
type carbs use a solid jet, (no pin holes).
VARIABLE VENTURI
- Getting Sucked In
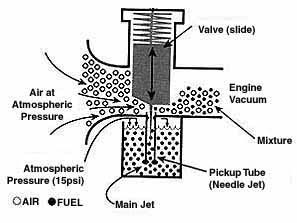
A venturi is a tube with a convex taper, (one end wider than the other). As air enters the wider end it's squeezed
into the narrower section of the tube, lowering the air's pressure. The area of lowest pressure is just past the
narrowest point and is called the depression. This has always seemed counterintuitive to me, but Bernoulli's Principle
outlines the fluid dynamics involved in this effect. This lowered pressure, or comparative vacuum is separate from
the engine vacuum. A variable venturi varies the venturi diameter at the depression
by raising or lowering an obstruction. This obstruction is called a slide. On a CV the slide
is called a piston or diaphragm valve.
CV or SLIDE CARB - The Great
Compromise
Both the CV and conventional slide carbs are classified as variable venturi carbs. The slide on a conventional
carb is directly connected to the throttle cable. Twist the throttle grip and the slide is raised in the venturi.
On a CV carb the throttle cable is connected to a butterfly valve that varies the volume through the venturi. It's
not the throttle, it's the pressure difference from the venturi to the outside atmosphere that moves the slide.
So which type is better? That depends on what you want to do. The manufacturers will tell you the CV is the next
best thing to electronic fuel injection. It does feed a precise amount of mixture to smooth out throttle response,
reduce pollution, and stretch your fuel budget and gas tank range.
This is great for tarmac cruising and feeling warm and fuzzy about doing your part to reduce global warming while
pocketing some spare change. It sure makes it easier for the manufacturers to get the EPA approval stamp on the
bike.
But what if you feel that no matter how much you hop up your little beast, you're never going to match the belching
of that cager in the gas guzzling V-12 ? What if you don't mind spending more for gas, and when you go off-road
you want a burst of power to blip over obstacles or steer through a wash without fanning your clutch while waiting
for the vacuum to build in the venturi? If you can discipline yourself to control the throttle so that you don't
bog your engine, then you want a conventional slide carb.
40
MM -Size Matters
With the same engine and carb design,
a 38mm diameter venturi will more
accurately meter the mixture on the low
end, while a 41mm diameter will do a
better job of supplying mixture at higher
engine speeds. It's another factor to
consider if you replace your carb.
MIXING AIR AND FUEL - All In the Pressure
It all starts in your engine. Think of your thumper as a big pump,
happily sucking and blowing down the road. During the intake stroke
the engine's piston descends in the cylinder. This creates a void that
sucks in whatever is on the other side of the open engine intake valves.
Unless the engine intake valves are open, the carb is not being sucked
on by the engine. This vacuum action powers the carb.
Look at the 4-cycles of our 4-stroke 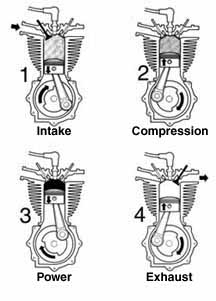 thumperpumper.
1) Intake - piston pulls down sucking mixture in.
Intake valves open, exhaust closed.
2) Compression - piston goes up.
Intake and exhaust valves closed.
3) Ignition/Power - piston forced down.
Intake and exhaust valves closed.
4) Exhaust - piston goes up blowing out burned gas.
Exhaust valves open, intake closed.
Each time the piston goes up and down, (two of the four strokes), one revolution has occurred. It takes two revolutions
to complete the four strokes, or one-half of a revolution to complete one of the four strokes. At redline, your
engine is sucking on the carb at a rate of over 60 times per second. At idle it's around 11 times a second. The
math below shows that with a 651cc displacement, a theoretical maximum of between 7 and 40 liters of mixture are
sucked in each second.
7500 .......(engine RPM)
/ 2 ...........(2 revs per intake stroke)
= 3750 .....(intake strokes per minute)
/ 60 .........(seconds per minute)
= 62 ........(intake strokes per second)
x .651 ......(engine displacement in liters)
= 40.69 ....(liters per second)
These numbers assume 100% efficiency. Mister_T calculates about
38% efficiency at idle. So these numbers are only to illustrate
the relative difference in volume from idle to redline.
Remember Bernoulli's effect in the venturi? Sitting below the venturi is
the fuel float chamber which is vented to the outside of the carb to match
atmospheric air pressure. The fuel in the float bowl is also 'vented' to the
low pressure of the venturi through the starter, pilot and main fuel jets.
So you can think of the float chamber as being pressurized in comparison
to the partial vacuum of the venturi. The fuel naturally tries to fill in the
low pressure of the venturi's depression by injecting itself through one,
or a combination of the three fuel jets.
THE ODDS - Skinny or Fat
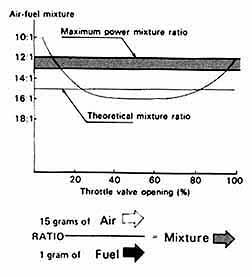
Any carb problem boils down to either it's too rich, (too much fuel or too little air), or it's too lean, (too
much air or too little fuel). The 'mixture', (a mixture of fuel and air, your engine's 'food'), is theoretically
ideal at around 15 parts of air to one part of gasoline
by weight, (not volume). The outer limits are 12:1
and 18:1 .
Too rich and you're wasting fuel, spewing more pollutants, diluting your oil, fouling engine parts, and performance
suffers. Too lean and you run the risk of detonation, engine operating at higher temperatures, and performance
suffers.
An air-cooled engine needs to run richer (more fuel)
to aid in engine cooling. This is another plus of our water-cooled system to balance out it's disadvantages.
PARTS - Is Parts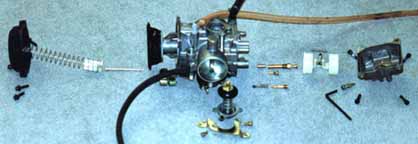
Supplementing the factory manuals, the following text and photos should make it easier
to understand how the carb works. The parts are broken into the following groups:
 FLOAT SYSTEM - You're
Floating In It
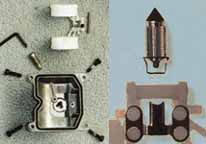 The float system
acts as a fuel reservoir to meet engine
demand. The float is hinged on a pin in the float boss. It
rises and falls with the fuel level in the float bowl. The small
metal tang integrated in the plastic float supports the float
valve, aka float needle. As the fuel in the float bowl rises,
the float valve is pushed into the valve seat, until it's high
enough to shut off the fuel flow to the bowl. The level in
the bowl drops lowering the float which pulls the float
valve from it's seat, and fills again.
 STARTER
ENRICHER - KLR Morning Coffee
 This system is referred to
as the
choke. But that's a misnomer. When
you apply the choke lever, what
you're doing is retracting a plunger
that opens a tube connected to the
starter jet, allowing additional fuel
to enter the venturi just below the
vacuum hose nipple. It supplements
the pilot system at start up.
PILOT SYSTEM - Steering You to Better Lows
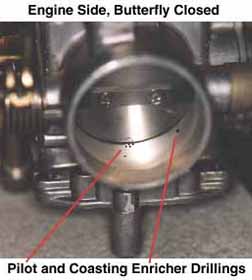 The
primary purpose of the pilot system is to supply the mixture at idle. It continues to supply fuel throughout the
entire throttle range, but after about 1/8 throttle is reached the MAIN SYSTEM starts to put out an increasing
percentage of the total mixture up to full throttle.
When you set the idle with that big screw on the right side of the carb, what you're doing is covering or uncovering
one or more of the four small holes that are drilled into the venturi, (leading to the pilot jet) just under the
butterfly valve, and letting more or less air pass the butterfly. When you adjust the pilot screw that's under
the carb, you are varying the amount of air premixing with the gas before it enters the venturi.
MAIN SYSTEM - The Meat
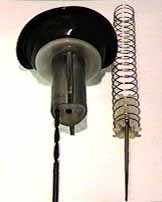

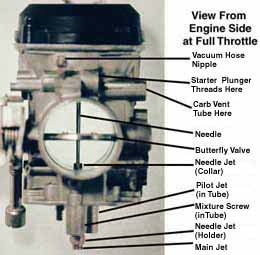
As you advance the throttle cable that's connected to the butterfly valve, the butterfly
opens to allow more air through the venturi. This increases the vacuum effect that
is transferred up
through the vacuum
drilling (the hole you
bored out for the
Dynojet kit), on the diaphragm valve (slide), that leads
to the TOP diaphragm chamber.
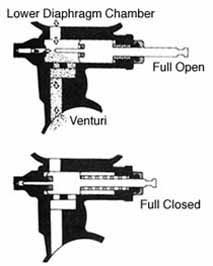
The top chamber is separated from the BOTTOM chamber
by the rubber diaphragm. The bottom chamber is open to
atmospheric pressure from the airbox by the crescent shaped
casting on the top of the venturi. When the vacuum in the top
chamber rises sufficiently, the constant ambient pressure
of the lower chamber, helps the diaphragm valve overcome
the downward force of the diaphragm spring, and it rises
from the venturi.
As the diaphragm valve is raised from the venturi
depression (lowest pressure area), the needle is pulled
further out of the needle jet, exposing a thinner portion
of the needle taper which allows even more fuel to rise
into the venturi to meet the increased engine demand.
COASTING ENRICHER
- Feeding a Closed Mouth
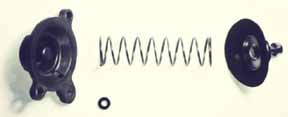 You're blasting down the trail and
you see a
hairpin coming up, so you close the throttle.
This closes the butterfly valve. You and your
400lb baby (the bike, not the other love of
your life), are still rolling with inertia, keeping
the engine revs high. Now it can't get the
mixture it's trying to suck in because the
butterfly valve is closed, blocking the air flow.
To compensate for this there's an air jet in the lower
diaphragm chamber that transfers ambient pressure to
one side of the coasting enricher's spring loaded cut off
valve. The excess vacuum in front of the butterfly valve
is transferred to a drilling that leads to the other side of
the cut off valve. This sucks it open, allowing the pilot
jet to feed more fuel to the engine preventing an overly
lean condition. (Pop. Pop. Pop.)
Enough theory. Time to get your hands dirty.
Part II - Tuning and Options
WARNING!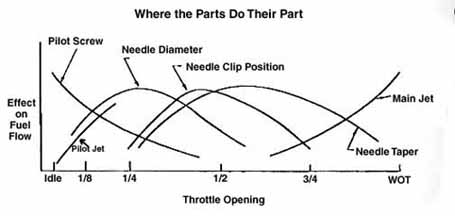
DO NOT tamper with your carb. Unless it's time to clean or overhaul
it, you've changed the exhaust or airfilter, you need to troubleshoot
it,or the Kid in you just has to know, "how does it go?"
When troubleshooting the carb, remember it's job is to mix fuel
and air to a specific ratio for the engines consumption.There
are many things that can cause an imbalance in your mixture
besides the carb itself. Things like a leaking or pinched hose,
valve clearance, a dirty air cleaner, removing the airbox lid,
even running out of fuel. Anything that affects your big pump
as it sucks and blows, affects your mixture. Before blaming
the carb, eliminate as many other variables as you can.
ON or OFF - Do I Have To?
Open the drain bolt to empty the float bowl. Remove the throttle cables,
loosen the boot clamps and rotate the bottom of the carb towards the left
side of the bike. Be careful that you don't smash the plastic starter cap nut,
it's 12 bucks for a new one. Remove the top, knowing that the cap will
fly off from spring pressure when you remove the last screw. Pull the
diaphragm valve out, drill it, then put in the new needle. Don't force
the diaphragm valve and needle down into the carb body when
reinstalling it. The needle should easily drop into the needle jet.
If it doesn't, pull it out and try again. Button it up and move on
to the bottom of the carb.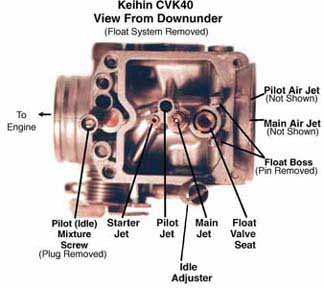
Drill out the cap on the pilot screw. Remove the 4 screws on the float bowl and remove it. Unscrew the main jet
only, leaving the needle jet holder in place. Screw in the new main jet and replace the float bowl. Rotate the
carb, tighten the boot clamps, and drain screw. You're done.
The factory method of removing the carb
from the bike isn't very convenient for
trailside repair, and I'm lazy anyway, so I
don't like to swing the subframe unless I
have to. If it's something that requires the
carb to come off, loosen the boot clamps,
disconnect the throttle cables, remove
starter (choke) plunger from the
handlebar then the carb, fuel hose, and
vacuum hose. Then muscle it out from the
right side of the bike starting with the click
here for enlarged view
end nearest the airbox.
If you don't know your own strength, be aware that your carb
is cast aluminum and can crack or gall if mishandled. Jake warned
of little parts that can easily be lost. I've noticed two parts that are
just waiting to laugh at you. The needle jet collar and the pilot screw
'o'ring both tend to stick in place. It may be that as the thin film of
fuel surrounding them dries, the surface tension is finally reduced
to a point where they can fall out on their own, even when you're
not around to see it. You wouldn't be the first or last person to be
missing these critical parts. Click here for to see more assembly
detail.
FLOAT HEIGHT
Drain the float bowl to check for water or other impurities. The float level is the first thing that needs to be
checked when tuning your carb. If the level is too high, it can cause a rich condition, too low and it can cause
a lean condition. If it's not set correctly, any other adjustments you make may have to be redone.
Kawasaki would love to sell you their gauge to check the height. But get a clear hose and attach it to the carb
drain valve at the bottom and tape it up to the side of your carb. Put the bike on the center stand or otherwise
make it level. Use an auxiliary gas can above the carb so it will continue to dump fuel. Or use the vacuum line
and suck on it to open the petcock valve. Open the carb drain valve. Get a gauge or ruler and measure right where
the carb body meets the float bowl to the level in the hose. Don't move the hose after you open the drain, or it
could cause the reading to be high.
Hopefully you'll see 0.5mm above the base of the carb body, +/-1mm, (only about .08" variance).If it needs
to be adjusted, and the carb is already off the bike, the method in the factory manual is the easiest way to set
the float height. It can also be done without removing it from the bike.
After disconnecting the gas and draining the fuel out, you'll need to rotate the carb and take the four screws
off the bottom of the float bowl and remove it. Then push the pin out of the float boss and gently remove the float
and float valve. The float valve will be hanging loosely on the float by a very thin wire that slips over a metal
tang on the float. Bending this tang on the float (not the wire on the float valve), will raise or lower your float
level. Just a small bend makes a big difference in the level, so it's best to make minute movements here.
Before bending anything, visually inspect the rubber tip on the float valve and spray some carb cleaner and compressed
air in the valve seat, to make sure nothing is blocking it open. Also see that the plastic float isn't leaking
and filling with gas. Then check the level again and rebend if needed.
PILOT SYSTEM TUNING
The ideal way to tune it would be to use the K&N
air/fuel monitor, a Colortune spark plug, or something similar. But you can get close
to this by using the following method.
Gently turn the pilot mixture clockwise until it's seated. Back it out two
full turns. Now thoroughly warm the engine and set the idle to 1300
RPM with the large throttle stop screw on the right side of the carb.
Get Jake's carb tool and slowly back the pilot screw out until the idle
starts to slow and note the total number of turns out from it's seat.
Now slowly screw the pilot screw back in until the idle again starts to
slow. Do the math and set your pilot screw between the two points
where the idle slowed. If you experience popping or it hesitates to
return to idle, experiment by turning the pilot screw out more.
MAIN SYSTEM TUNING
 Opening the butterfly valve
with the throttle grip brings the main system into play. More air through the depression increases
the vacuum to both the top diaphragm chamber and needle jet. As the vacuum in the top chamber causes
the diaphragm valve to raise in the depression, the needle which is attached to the valve, is pulled
further out of the needle jet. The higher the needle goes, the progressively thinner cross section
of the needle allows more fuel to pass through the needle jet.
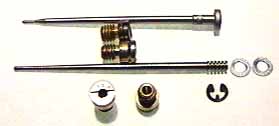
The Dynojet needle has 5 grooves, #1 at the top, to
#5 closest to the needle tip. Putting the E clip
towards the top leans the mixture because a thicker
portion of the needle is blocking fuel flow through
the needle jet. Placing the E clip closer to the tip
enrichens the mixture by pulling the needle further
from the needle jet, exposing a thinner portion to
allow more fuel flow.


The manual shows the KLR600 needle has these grooves, but the KLR650 comes
stock with no grooves for adjustments. The needle jet size also affects flow.
The last factor in the main system is the Main Jet. When the diaphragm
valve is fully raised and the needle is at it's farthest point out of the
needle jet, the Main Jet size has the most influence on quantity of fuel
delivered. Below 3/4 throttle there's little difference between a 136 and
a 150 main jet. At full throttle there is a huge difference. (Higher
numbered jets have a bigger hole.) Some of the Listers on the klr650 news
group have taken to Shimming the stock needle and precisely drilling the
stock main jet with some success. One fixed a torn diaphragm valve with a
tire tube patch!
OPTIONS
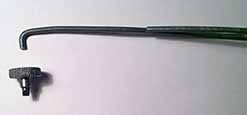
It's hard to tune the pilot screw with the carb in place and the engine running. Jake created a tool just for this.
You can call him at (435) 387-5575. I'm testing a new screw that was developed for the Harley but seems to be working
so far on the KLR. I'll post the results in a future update.
 Besides the Dynojet kit,
you can also use the Dial-A-Jet
to boost the top end. Mixed results have been reported with
it. As you build up the engine you may need to order a
larger pilot jet. At a certain point in beefing up the
engine, our humble CVK40 will have no more to give,
and you'll have to look at replacing it with a larger carb.
Originally Posted by
Redondo Ron
12/98


 Most carbs have
a one piece needle jet. On the CVK40 it consists of a collar and what Kawasaki calls a holder.
Most 4-strokes have pin holes along the length of this brass jet. These pin holes allow air from the air jet to
premix with fuel from the fuel jet to start the mixture emulsification process before it enters the venturi. Primary
type carbs use a solid jet, (no pin holes).

 thumperpumper.

 FLOAT SYSTEM - You're
Floating In It
 The float system
acts as a fuel reservoir to meet engine
 STARTER
ENRICHER - KLR Morning Coffee
 This system is referred to
as the
  The
primary purpose of the pilot system is to supply the mixture at idle. It continues to supply fuel throughout the
entire throttle range, but after about 1/8 throttle is reached the MAIN SYSTEM starts to put out an increasing
percentage of the total mixture up to full throttle.

 You're blasting down the trail and
you see a


 Besides the Dynojet kit,
you can also use the Dial-A-Jet